
In this post, I am sharing some of the tips and tricks I’ve learned from building .NET microservices over the years. A big thank you to the team at the Festive Tech Calendar, as this is my contribution this year.
All throughout December, make sure you check out some of the fantastic sessions offered up by the wonderful members of the community. You can see the daily schedule on the website.
This year, the team are raising money for the Raspberry Pi Foundation, check out the Just Giving page to learn more and donate to this great cause.
Service architecture
To get us started, I want to first discuss architecture of microservices. It’s a topic I’ve discussed here on the blog before and many times in speaking sessions, but I wanted to reiterate some of it here.
The benefits of microservices are well documented, and I don’t want to just repeat them here. I have a post which discusses this in detail.
I do however want to quickly talk about how you architect a microservice, as understanding this goes a long way to building efficient microservices.
The first piece of advice may seem counter productive to the purpose of this whole post.
The likelihood that you won’t need microservices is the first best practice. It’s likely that the business needs will change quickly while you’re developing your MVP if your application has no users. This is merely a result of the nature of software development and the feedback loop that must be established while determining the essential functionalities your system must offer. Microservices increase management complexity and overhead exponentially. This is why having all of the logic and code in one codebase is significantly less of a burden for new projects because it makes it simpler to reorganise the boundaries between the various application modules.
Take the practice of ordering a pizza online. Defining the simple problem of ordering a pizza online; as we think about it, it soon becomes a large list of features.
We’ll need to view a menu, select a pizza, customise the pizza, pay online, track the delivery. As the owner, you’ll want to manage the order statuses and edit the menu.
Microservices work well when you have a solid grasp of the different services required by your system.
However, if an application’s fundamental requirements are not well stated, managing microservices becomes far more challenging. Redefining service interactions, APIs, and data structures in microservices is quite expensive since there are usually a lot more moving components that require coordination. Our recommendation is to keep things straightforward until you’ve gathered enough user input to feel comfortable that you’ve taken into account and comprehended your consumers’ fundamental demands.
Language Specific Practices
Let’s now look at some specifics to the .NET language that we can use when building microservices.
From experience of building these over the years, here are some points I want to discuss.
- Data sovereignty per microservice
- Keeping your project DRY
- Keep the data layer separate
- Introduction of GraphQL
- Use health and readiness probes
Let’s now have a look in a little more detail about these.
Data sovereignty per microservice
This is not a common use case, but sometimes, especially in large enterprise solutions, such as a cloud-native ERP for example, where we have many microservices, you may come across the need for tenants to have better control over their data.
While the microservice model is perfect for creating another deployment of your solution to a sovereign data centre, this may not be ideal from a management perspective, it can also be cost prohibitive, as you’re likely to have to pass on all of those costs to your client.
While I generally do not advocate the use of data sources within containers, it is something that I’ve seen done, and as it’s a container, it means it can be easily deployed to wherever you want.
Personally, my recommendation would be building your application for this use case if it needs it, remember, design and build your application for the features and use cases it needs. Not for what it might need.
Keeping your project DRY
The DRY principle (don’t repeat yourself) is not a new thing, it’s something in software engineering we have used for a long time. It’s aim as the name suggests is to reduce the repetition of information which is likely to change, replacing it instead with abstractions that are less likely to change and using parameters for example where that information may change.
Before you write any code, you should design a .NET project which conforms to the DRY principle, after all, you may be creating tens or even hundreds of these depending on the size and scale of your project.
Spending a little time upfront to think about common code every microservice will need, for example in an API, authentication services, monitoring agents, etc, will save you countless amounts of effort later on refactoring or building from scratch.
My top tip here is to never take an existing API or microservice and make it into a template, you may leave something behind you shouldn’t.
Keep the data layer separate
This point has two parts to it, first, as we’ve already highlighted, don’t make your database layer into a container. For the most part, database engines will work in containers. If you are working in development, then you may benefit from having less clutter, the ability to work easily on multiple projects without the complexity of multiple database instances.
From a development perspective, especially if you are working on multiple projects at once (as to if that is a good idea or not, that’s a whole other subject!), I really like this approach.
Having backend services be defined in a docker-compose.yaml file for each project and bind to local ports of the host. This way, I can run a dev server locally, using the complete power of my tools, and have it interact with databases which live in containers.
However, keep in mind that containers are meant to be running stateless applications, that do not mind getting terminated at any time.
The second part of this is around general design of the API. If for example you are using something like GraphQL, (which I must add is probably one of my favourite patterns at the moment) then you have one single endpoint, let’s say /graph. In the backend, have microservices which access data independently from the graph API endpoint.
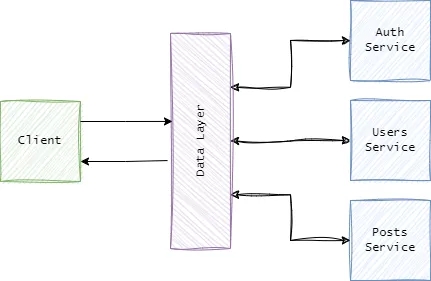
This way you are keeping to the service only pattern and making it easier to update those services without affecting the graph endpoint in the future. Just bear in mind any contracts that need updating if the model changes.
Introduction of GraphQL
We’ve briefly mentioned it above, but I love the way GraphQL can have a positive impact on your project. One of the biggest reasons is that I query only for the data I need, and can query multiple objects at once, this means the number of calls I am backing to the backend is reduced.
The backend may make separate calls to get the data, but it’s one request from the front end, handling exceptions, errors, becomes much easier with one request.
Compared to a traditional RESTful API, GraphQL does add complexity, so it may not be for everyone, you may also struggle if you need to cache data with GraphQL.
So in some uses cases, it’s best to stick to traditional RESTful APIs, but I make that decision when I am looking at the design of the application.
When you are aiming to develop a simple application with a couple of fields, GraphQL can over complicate your use by adding stuff like – types, queries, resolvers, mutators and other high order components.
Use health and readiness probes
As you may well be aware, .NET APIs and applications in general, on the first run after starting can be slow. I used to get caught out with this many times, especially when I was new to Azure Kubernetes Service.
However, when I discovered probes, this changed my approach. Now, with every microservice I build, that is destined to sit on Kubernetes, I always build in a readiness probe and a health probe.
You can look at more detail how these work in the following article, but here is an example of the code I use in a controller to make this happen.
namespace M12D.Controllers
{
    [Route("[controller]")]
    public class ReadyController : Controller
    {
        private static bool warmed = false;
        private readonly IHttpClientFactory _clientFactory;

        public ReadyController(IHttpClientFactory clientFactory)
        {
            _clientFactory = clientFactory;
        }

        private string GetFullUrl(string relativeUrl) =>
            $"{Request.Scheme}://{Request.Host}{relativeUrl}";

        private async Task DoWarmUp()
        {
            // Warm up the /account endpoint.
            var request = new HttpRequestMessage(HttpMethod.Get,
            GetFullUrl(Url.Action("Get", "Account")));
            await _clientFactory.SendAsync(request);

            warmed = true;
        }

        [HttpGet, HttpHead]
        public async Task<IActionResult> Get()
        {
            if (!warmed)
            {
                await DoWarmUp();
            }

            return Ok("Ready!");
        }
    }
}
The code is quite simple, but let’s have a look at what is happening in a little more detail.
First of all, we are using IHttpClientFactory instead of HttpClient, if you’re not using this, then read up on why you should. We build the address of the endpoint we want to warmup, in this example we’re sending a GET request to the /account endpoint.
When that request has completed (you may add a check for IsSuccessStatusCode here as well), we set the warmup to true. Then we return a HTTP 200 simply stating “Ready!”. Over in your Kubernetes YAML file, you will need to add the following to your container spec.
readinessProbe:
  httpGet:
    path: /ready
    port: 5000
  initialDelaySeconds: 10
  timeoutSeconds: 60
  periodSeconds: 60
When this is deployed, what will happen is that Kubernetes will not mark the pod as ready until the readiness probe has completed, in this configuration, production traffic will not be sent there until the pod is marked as ready.
Health probes, or liveness probes to use the official term work in the same way. These endpoints ensure the container is working as requested.
If the handler for the server’s /health path for example returns a success code, the kubelet considers the container to be alive and healthy. If the handler returns a failure code, the kubelet kills the container and restarts it.
Any code greater than or equal to 200 and less than 400 indicates success. Any other code indicates failure.
